The blog has been rather neglected for the past months. I’ve had successful treatment for a second bout of Lyme disease (the ticks and I both like living in the woods), and my husband had a liver tumor removed. So, it was a chewy medical time, and other things had to wait. We are both doing much better, and I’m back at it. Almost out the door to the National Council on Education for the Ceramic Arts (NCECA) conference in Milwaukee tomorrow (3-17-2014)
The die cutter continues to intrigue me. I’m still working my way through some video tutorials and online info. The software does amazing things, but some days I have trouble figuring out what I don’t know to get where I want to go. I’ve been working on some cards in cardstock to learn the software – paper is cheaper than other materials, and there are bound to be failures while learning. The manual for the Zing die cutter says to experiment: you’re bound to have failures, but you will learn a lot. A good attitude. There is a great deal of info online, and I’m working on a handout for my web site to list some of those resources.
In studio, I had cups. I wanted to do some sunflowers. Realism isn’t a big goal for me. Many of the plants I paint are made up, rather than descriptive of a specific plant or fruit – the generic idea of plants, leaves, flowers, fruit. But even within stylization, there are some shapes that are harder to make with a brush in one fluid stroke. With majolica, the overlaps often show. So, I made some Tyvek stencils of wide leaves with toothed edges.
The stencils won’t stick to raw glaze, so I am reduced to just holding them on the cup to mask my brush stroke, 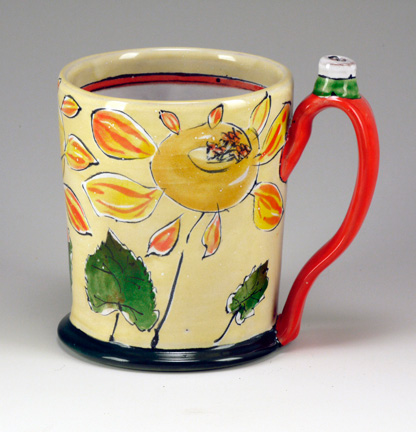
preferable with the cup on its side so the stencil sits with gravity helping. The results are not as crisp as a slip stencil, but it does help me get closer to that broad leaf shape with a toothed edge in one stroke with a big, soft brush.
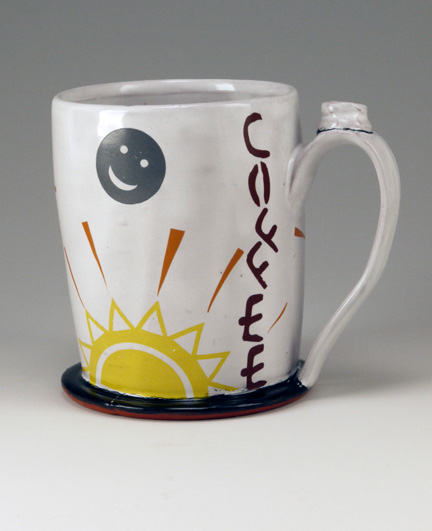
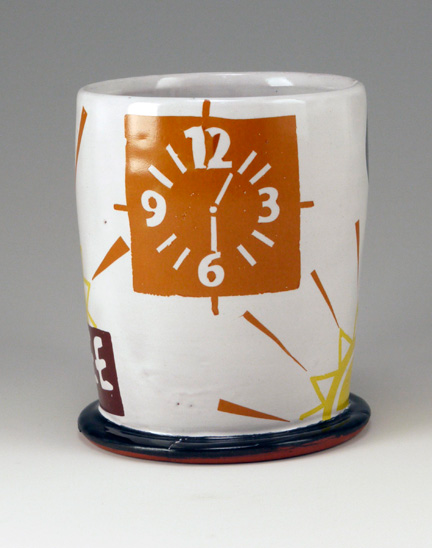
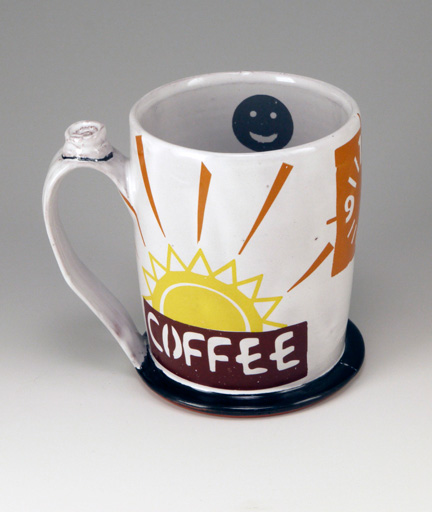
At NCECA, I will be the point person for an NCECA Connections group for die-cutter shop talk, Friday, 5 pm. Check the program or with the NCECA booth for location. The Ceramic Art Cart/Keraflex people are testing some un-leaded sheets of solid decal color, and kindly provided samples sheets in a number of colors. Last night I jammed on it and did my first decal cuts on the die cutter, using their samples. Took some adjusting to get the right blade depth (check the sample cut on the decal medium itself, not just the backing), force (80), speed (6- which is s-l-o-w), and cut (2 passes). The first time with less force and one pass, didn’t cut through. Worked better with the settings listed, but this is a very slow cut. Decals were put in water, slid onto the cup once loosened from the backing, patted dry, and fired to 017 slow in my test kiln. Results below. This is how I would like to imagine I feel in the morning. I was thinking about getting up early and how some days coffee makes the sun rise. The brown decal sheet was the right coffee color. These were done on top of an already glaze-fired, plain white body majolica cup. Yellow, ochre, chocolate, and grey decal sheets used. If you’re at NCECA and want to talk shop about die cutters, come find the Connections group.
Linda, I’m curious how to do a full pattern stencil on the inside of a majolica bowl. I do stencil graffiti art and pottery and would like to combine the two. I would love any advice that you could give me on this?
Thank you,
Kevin
Hi Kevin, Tricky on the inside unless the walls are straight -Like a truncated cone. Have you ever seen a globe peeled into sections and laid flat? If you wanted to do the entire interior, you might have to do something like that with a stencil.you could also stencil onto paper strips, and transfer the mono prints to the inside of the bowl that way. Artists Jason Burnett and Charlie Cummings are very good print on clay – perhaps they have a better idea?
Thank you Linda for this! This was very helpful.
Pauline, thanks for the note. You’re un-stoppable and fearless! I’ve enjoyed the images on your blog http://paulinesstuff.blogspot.com/ about what you’ve done with fun foam type of medium for relief. Wow.
Nice Linda, look forward to hearing more. I have been learning tons about this subject with my Cameo Digital Cutter. I use the software every day, even for things I don’t need/want to cut. I found out I can get nice crisp designs on silkscreens by using the software to clean up designs and print onto transparencies to make silkscreens. I also recently have found that polypropylene document covers (page protectors), work great as stencils–and very cheap, the big drawback is not being able to see them, they are glareproof. I have filled a notebook with paint pushed through them and not washing them, just so I can see the stencils. Have not yet tried on clay. Wish I had a test kiln. We just finished empty bowls and now I need to make things and try both these stencils and my new silkscreens. I found that painting through those thin poly stencils with makeup sponges works a charm, so I am anxious to use that method with my silkscreens on clay with underglazes too.